Change data capture transformations are designed to be used with Microsoft SQL Server Integration Services.
1) Create a new Data Dictionary, different than the one used for DataSync, to use for the transformation data tables. Click the Start button and then point to All Programs. Point to CONNX Driver and then click CONNX Data Dictionary. The Open dialog box appears, click cancel to get to a new empty Data Dictionary.
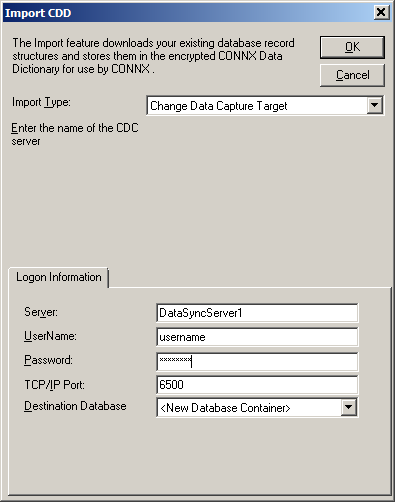
2) Import the new change data capture tables into the new Data Dictionary. Press the import button, then in the Import Type dropdown list, select Change Data Capture Target. Then in the Server field put the name of the server where DataSync is running. For the UserName and Password fields, enter the user name and password that was used to connect to the DataSync Data Dictionary. For example if user1 and pwd1 were used to connect to the Data Dictionary opened by DataSync, then user1 and pwd1 would be entered on this screen.
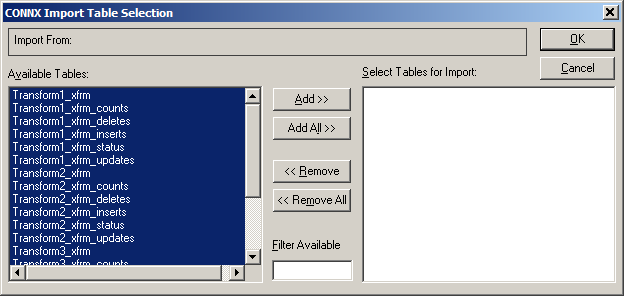
3) In the Import Table Selection screen, press the Add All button to get all the change data capture tables. These will be used later by the SQL Server Integration Services Work packages to get the rows that have been inserted, updated or deleted. Press OK and the tables are added to the Data Dictionary. Save the Data Dictionary and close the Data Dictionary Manager tool. It can be in the same folder as the DataSync Data Dictionary, but it needs to have a different name.
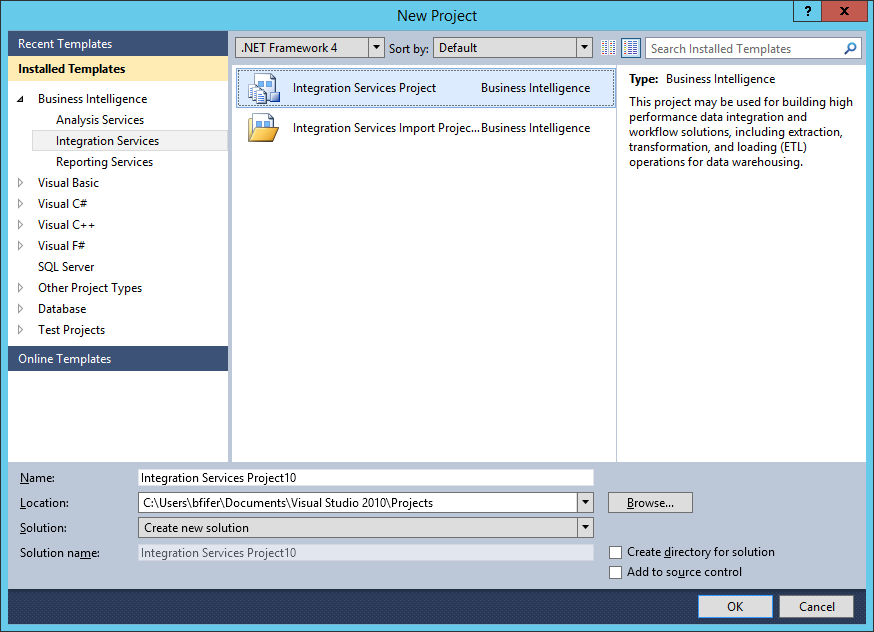
4) Now the SQL Server Integration Services package can be built. This walkthrough will be with SQL Server 2012 Integration Services, however SQL Server 2005, 2008 and 2014 Integration Services works the same way. Click the Start button and then point to All Programs. Point to Microsoft SQL Server 2012, then click SQL Server Business Intelligence Development Studio. Click File --> New --> Project to open the New Project form. Select the "Business Intelligence Project" project type and then "Integration Services Project" enter a name and press the OK button.
5) This should open an empty Package.dtsx environment, and the selected tab should be "Control Flow". The first thing that must be done is to add a connection to the transform table CONNX Data Dictionary. To add a connection, right click in the "Connection Managers" tab in the lower part of the "Control Flow" tab then select "New Connection.." from the pop up menu.
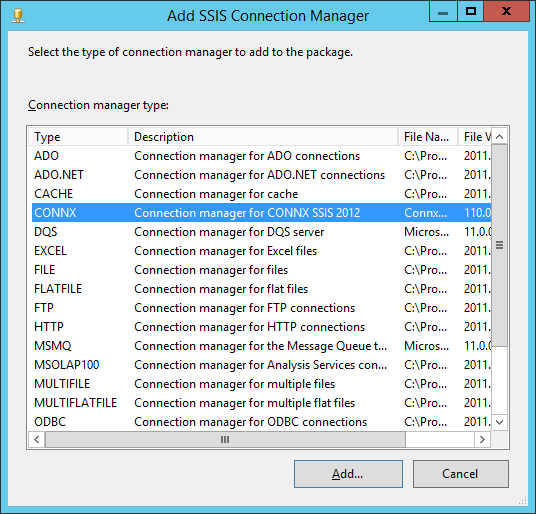
6) Select "CONNX" from the list of Connection manager Types and press the "Add..." button.
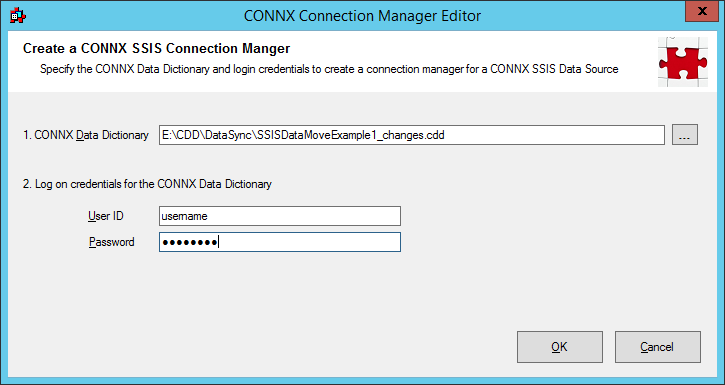
7) Enter the name and location of the CONNX Data Dictionary that contains the transform tables. Also enter the username and password used to connect to that transform Data Dictionary. Press the OK button and it will connect to the data dictionary and verify the connection information.
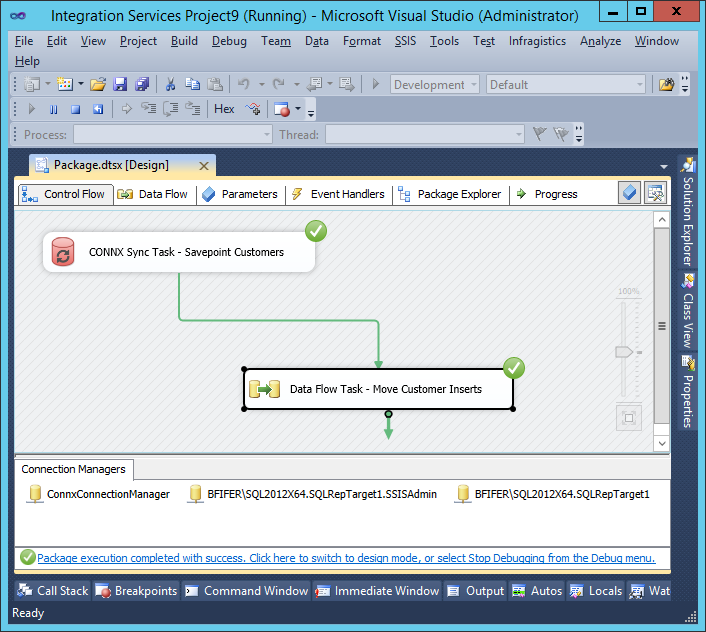
8) Now that the connection is added in the "Connection Managers" tab, in the SSIS toolbox select drag the CONNX Sync Task to the design space. This will run the Savepoint Sync in the DataSync tool from the SSIS package. Rename it to - Savepoint Customers.
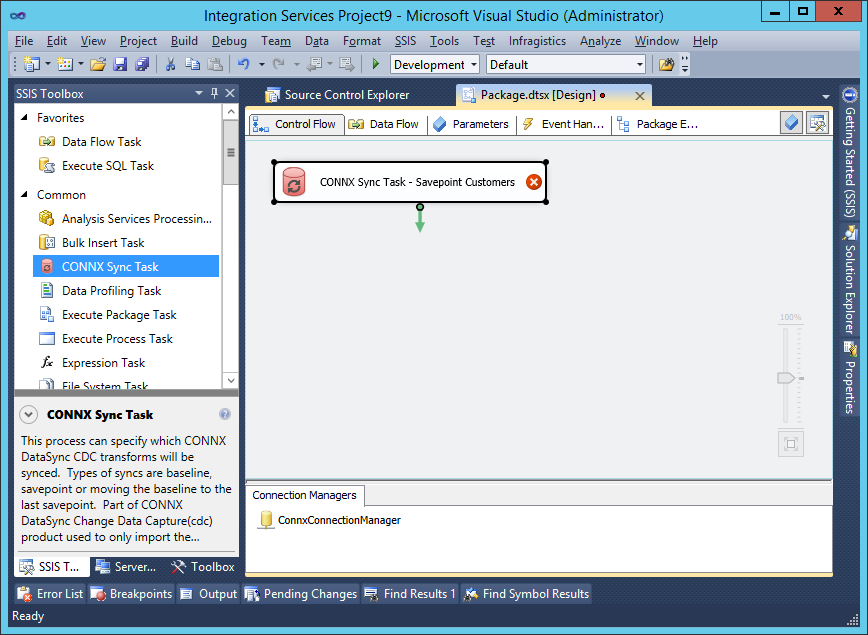
9) Double click on the CONNX Sync Task to configure it. If there is only one CONNX Connection manager, it will connect to that and list the Change Data Capture Transforms available. Select the transform to sync and then on the right select the type of Sync to run. Descriptions are:
Savepoint sync: A Savepoint sync task will tell the DataSync transformation server to find all the changes that have occurred since the last time a Baseline sync was run. This can be run from either DataSync itself, or from this CONNX Sync task.
Baseline sync: A Baseline sync task when run will tell the DataSync transformation server to read and save the data as it is. That way all future Savepoint syncs will use this as starting point to find changes in the data. Can be run from either DataSync,or this CONNX Sync task.
Move Baseline to Savepoint sync: Making the last Savepoint sync the new change baseline is the perfect way to reset the starting point for tracking changes after the previous changes have been migrated to the targets. It doesn't actually run a Baseline sync, it simply sets the last Savepoint sync to be the new baseline.
Press OK to close the window and save the changes.
* The SQL to be executed is for reference only, The sql string is created by selecting the transform and type of sync, it is displayed so the admin knows what SQL is actually being executed if they wish to. No user editing of this line directly is necessary.

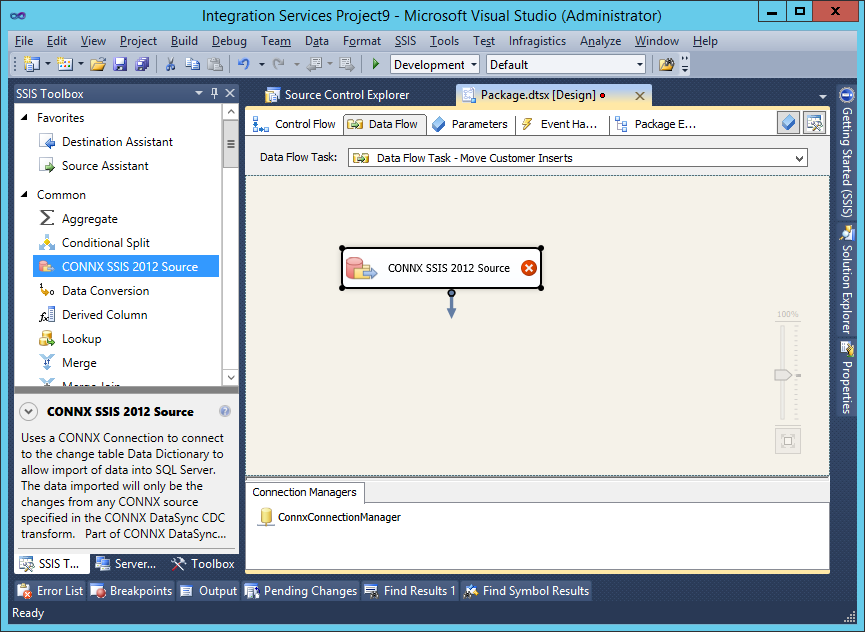
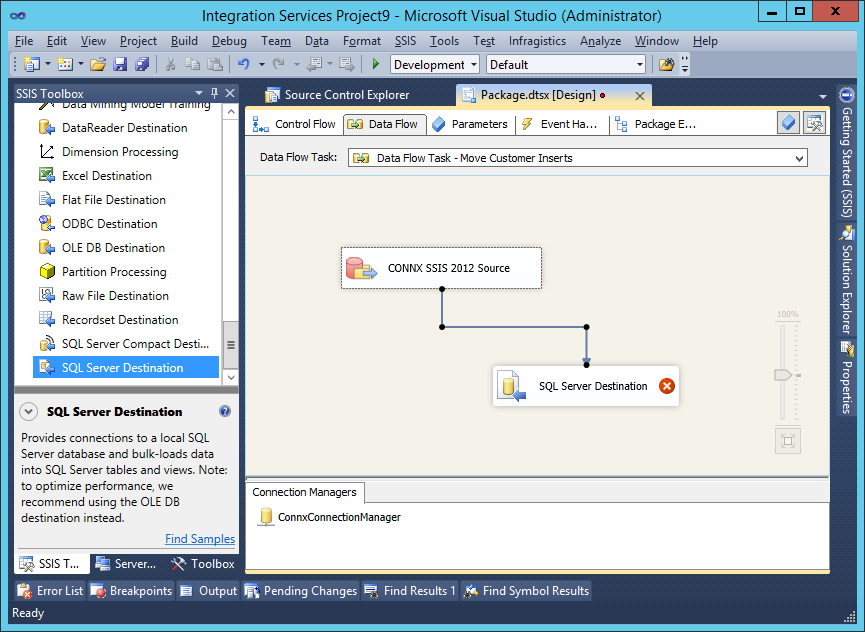
10) Now that the savepoint sync is run, we can get the data that has changed and move it into the target table. From the SSIS toolbox, drag a Data Flow Task to the designer and double click on it to bring up the Data Flow designer. Notice the SSIS toolbox has changed to only tools that work in a Data Flow Task. Drag a CONNX SSIS 2012 Source object to the design pane.
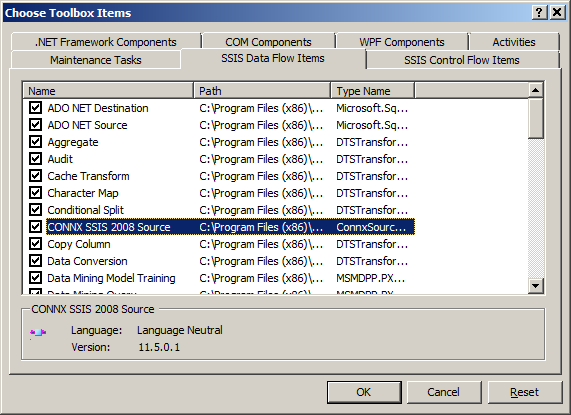
* Note: In the Business Development Studios for SQL Server 2012 and 2014, the toolbox will automatically updated with the CONNX SSIS components. However in Business Development Studio for SQL Server 2005 and 2008 you will need to add them to the toolbox. If there is no "CONNX SSIS 2008 Source" object in the toolbox, right click on the toolbox and select "Choose Items..." from the popup menu. The list of available tools will take several seconds to appear, when it does, choose "SSIS Data Flow Items" and put a check in the box next to"CONNX SSIS 2008 Source".
11) Double click on the CONNX SSIS 2012 Source box in the design window to configure the source data. If there is only one CONNX Connection manager then it will automatically connect to it and display the change data capture tables. The list of tables will have the name of the transform first, then be appended with what data is in the table. For this one we are going to use the _xfrm_inserts table to get all new rows that have been inserted into the table. Press the OK button to Save the new configuration and return to the Data Flow designer. Another option to specifying a table is to use a select SQL Statement using the change tables. This is there for customized data retrieval and is an option, however likely all the change data is needed and selecting a table will suffice.

12) The Data Flow is now ready for a target to move the change data to. Go to the toolbox, in the "Data Flow Destinations" section and drag "SQL Server Destination" to the design pane and drop it. Then drag the green arrow from the "CONNX SSIS 2012 Source" object to the "SQL Server Destination" object and the designer will create a green line between the two objects.
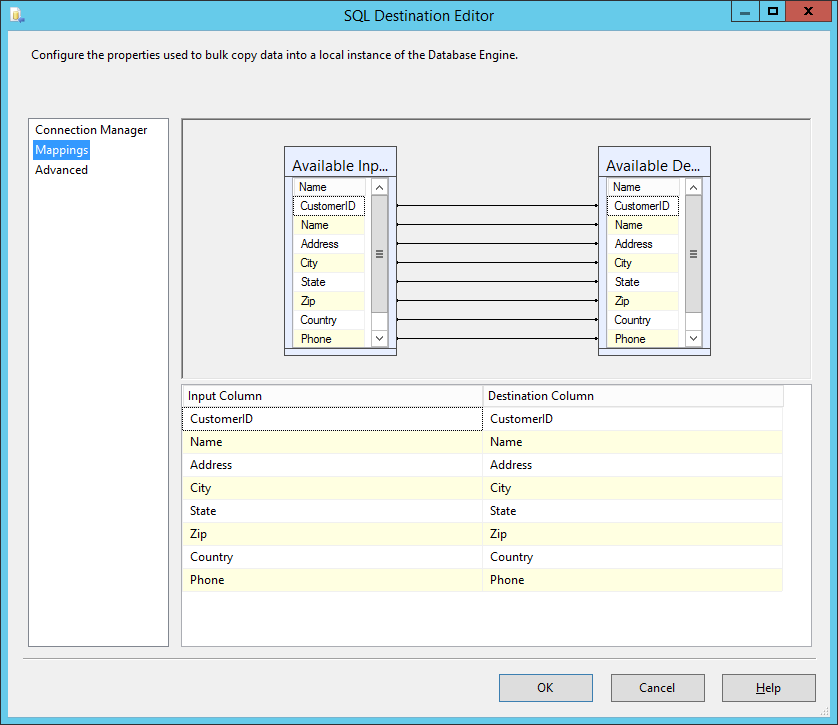
13) Now we need to edit where the change data is moved to, right click on the SQL Server Destination object and select "Edit". That will open the SQL Destination Editor on the Connection manager screen. Next to the "Connection Manager" dropdown list select the "New..." button. That will bring up the Connection Configure screen, if you have a SQL Server connection it will be displayed in the list. If not, Select the "New" button and input the connection information to the SQL Database you wish to be the target. Select "OK" to finish and the connection specified will now be in the "Connection Manager" dropdown.
14) Select a table to move the data to from the "Use a table or view:" dropdown menu. If this is going to a new table, press the "New..." button and specify the name in the create table statement then hit "OK" and it will be selected in the dropdown menu.
15) Select "Mappings" in the list on the left, the default mappings will be displayed. Change if necessary and when finished press "OK" to return to the Data Flow designer.
16) The package is now ready to move change data. The package can be run by pressing F5, green indicates a successful run, red indicates an error. Note, if there has not been any changes on the source data the sync will be green for success, however no entries will be moved because there were no changes.